Table of Contents
1. Making Tiles
2. Setting up Tiles
3. Using proMap Tile Editor
4. Setting up and using Tile-Connections
5. Making and using Patterns
6. Settings and Controls
7. Loading build maps
8. Optimisations and best practice
9. FAQ and tips
In this screenshot there is a bit of explanation of how to make your tiles:
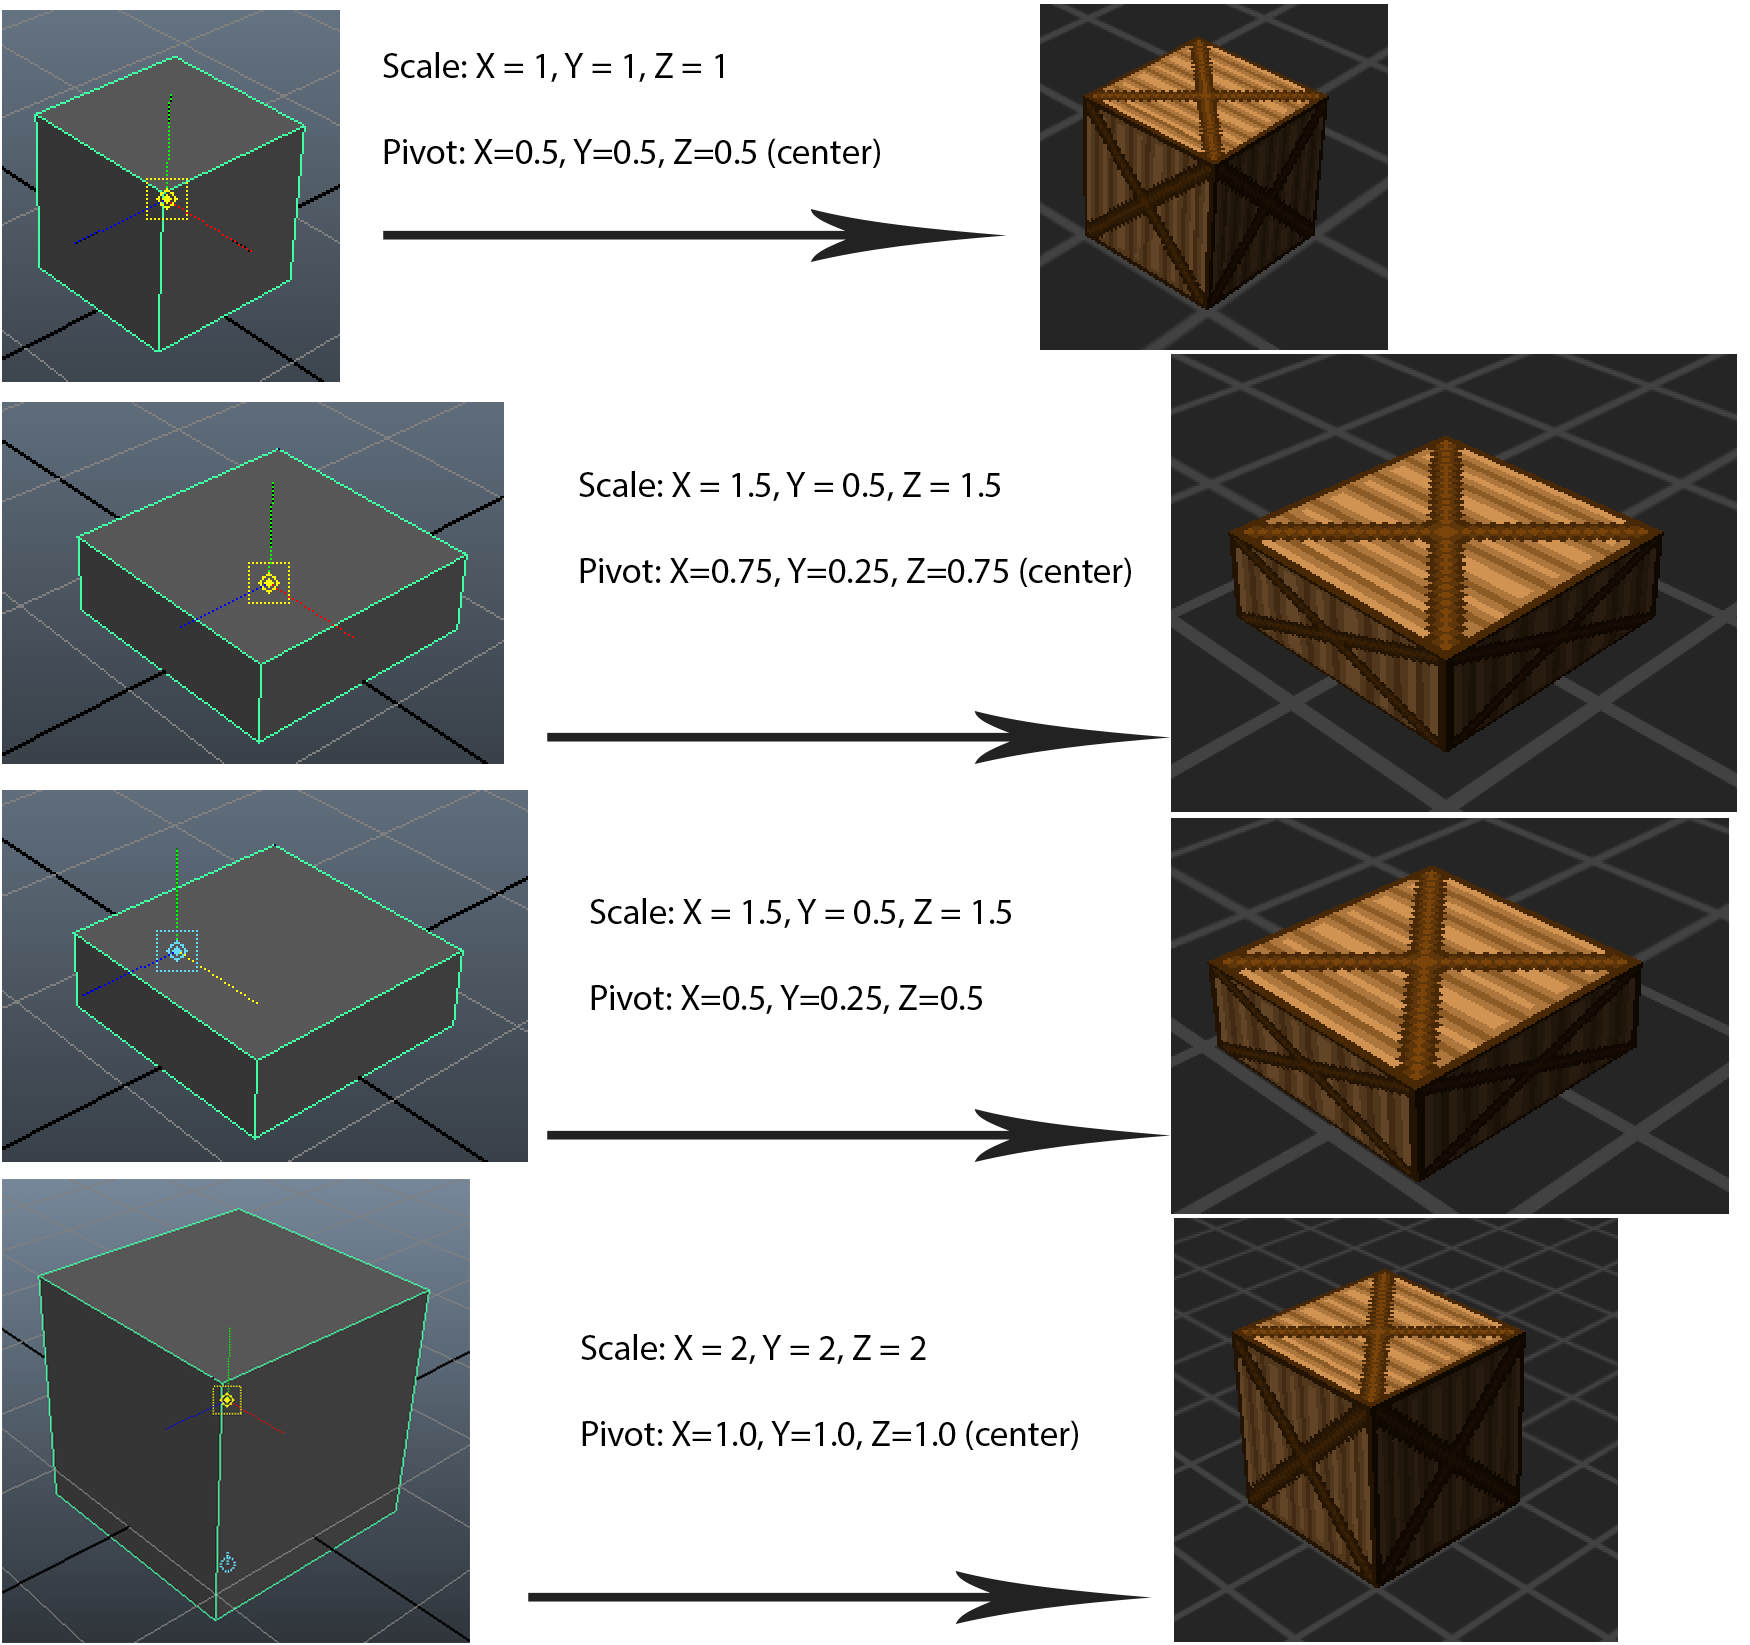
At this point Y pivot does not matter. But in any case I suggest always to Center your Pivot in the Mesh unless you have some specific cases.
To setup Tiles you need to open “Window->proTileMapEditor->Tile Editor”.
Create different Categories for different Tile Collections and drag & drop Prefabs on the window.

Tiles Type: You can choose either Static or Dynamic. Dynamic Tiles will not be batched (it’s basically for tiles like Units).
Clicking on Tile Category Name will show drop down list of all existing categories.
And that is basically it, they are now set up to use for building.
When your tiles are set up to start building your map you need to open and run “_proTileMapEditor.scene” scene which is in “proTileMapEditor” folder.
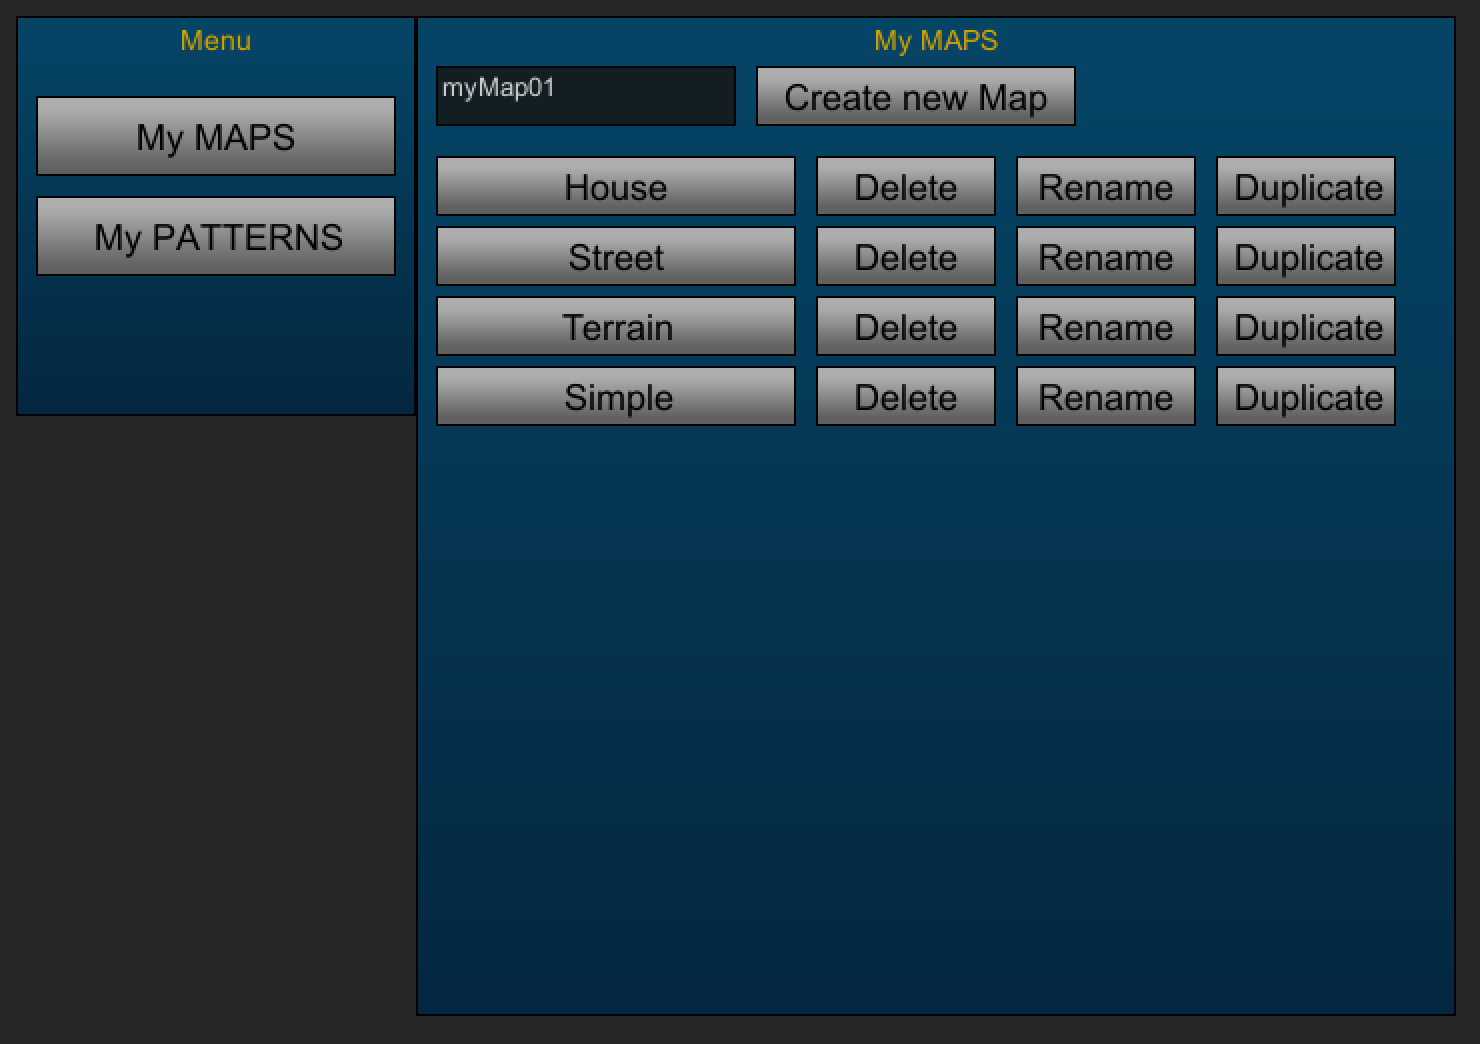
When Editor is running you will be asked to Create a New Map:
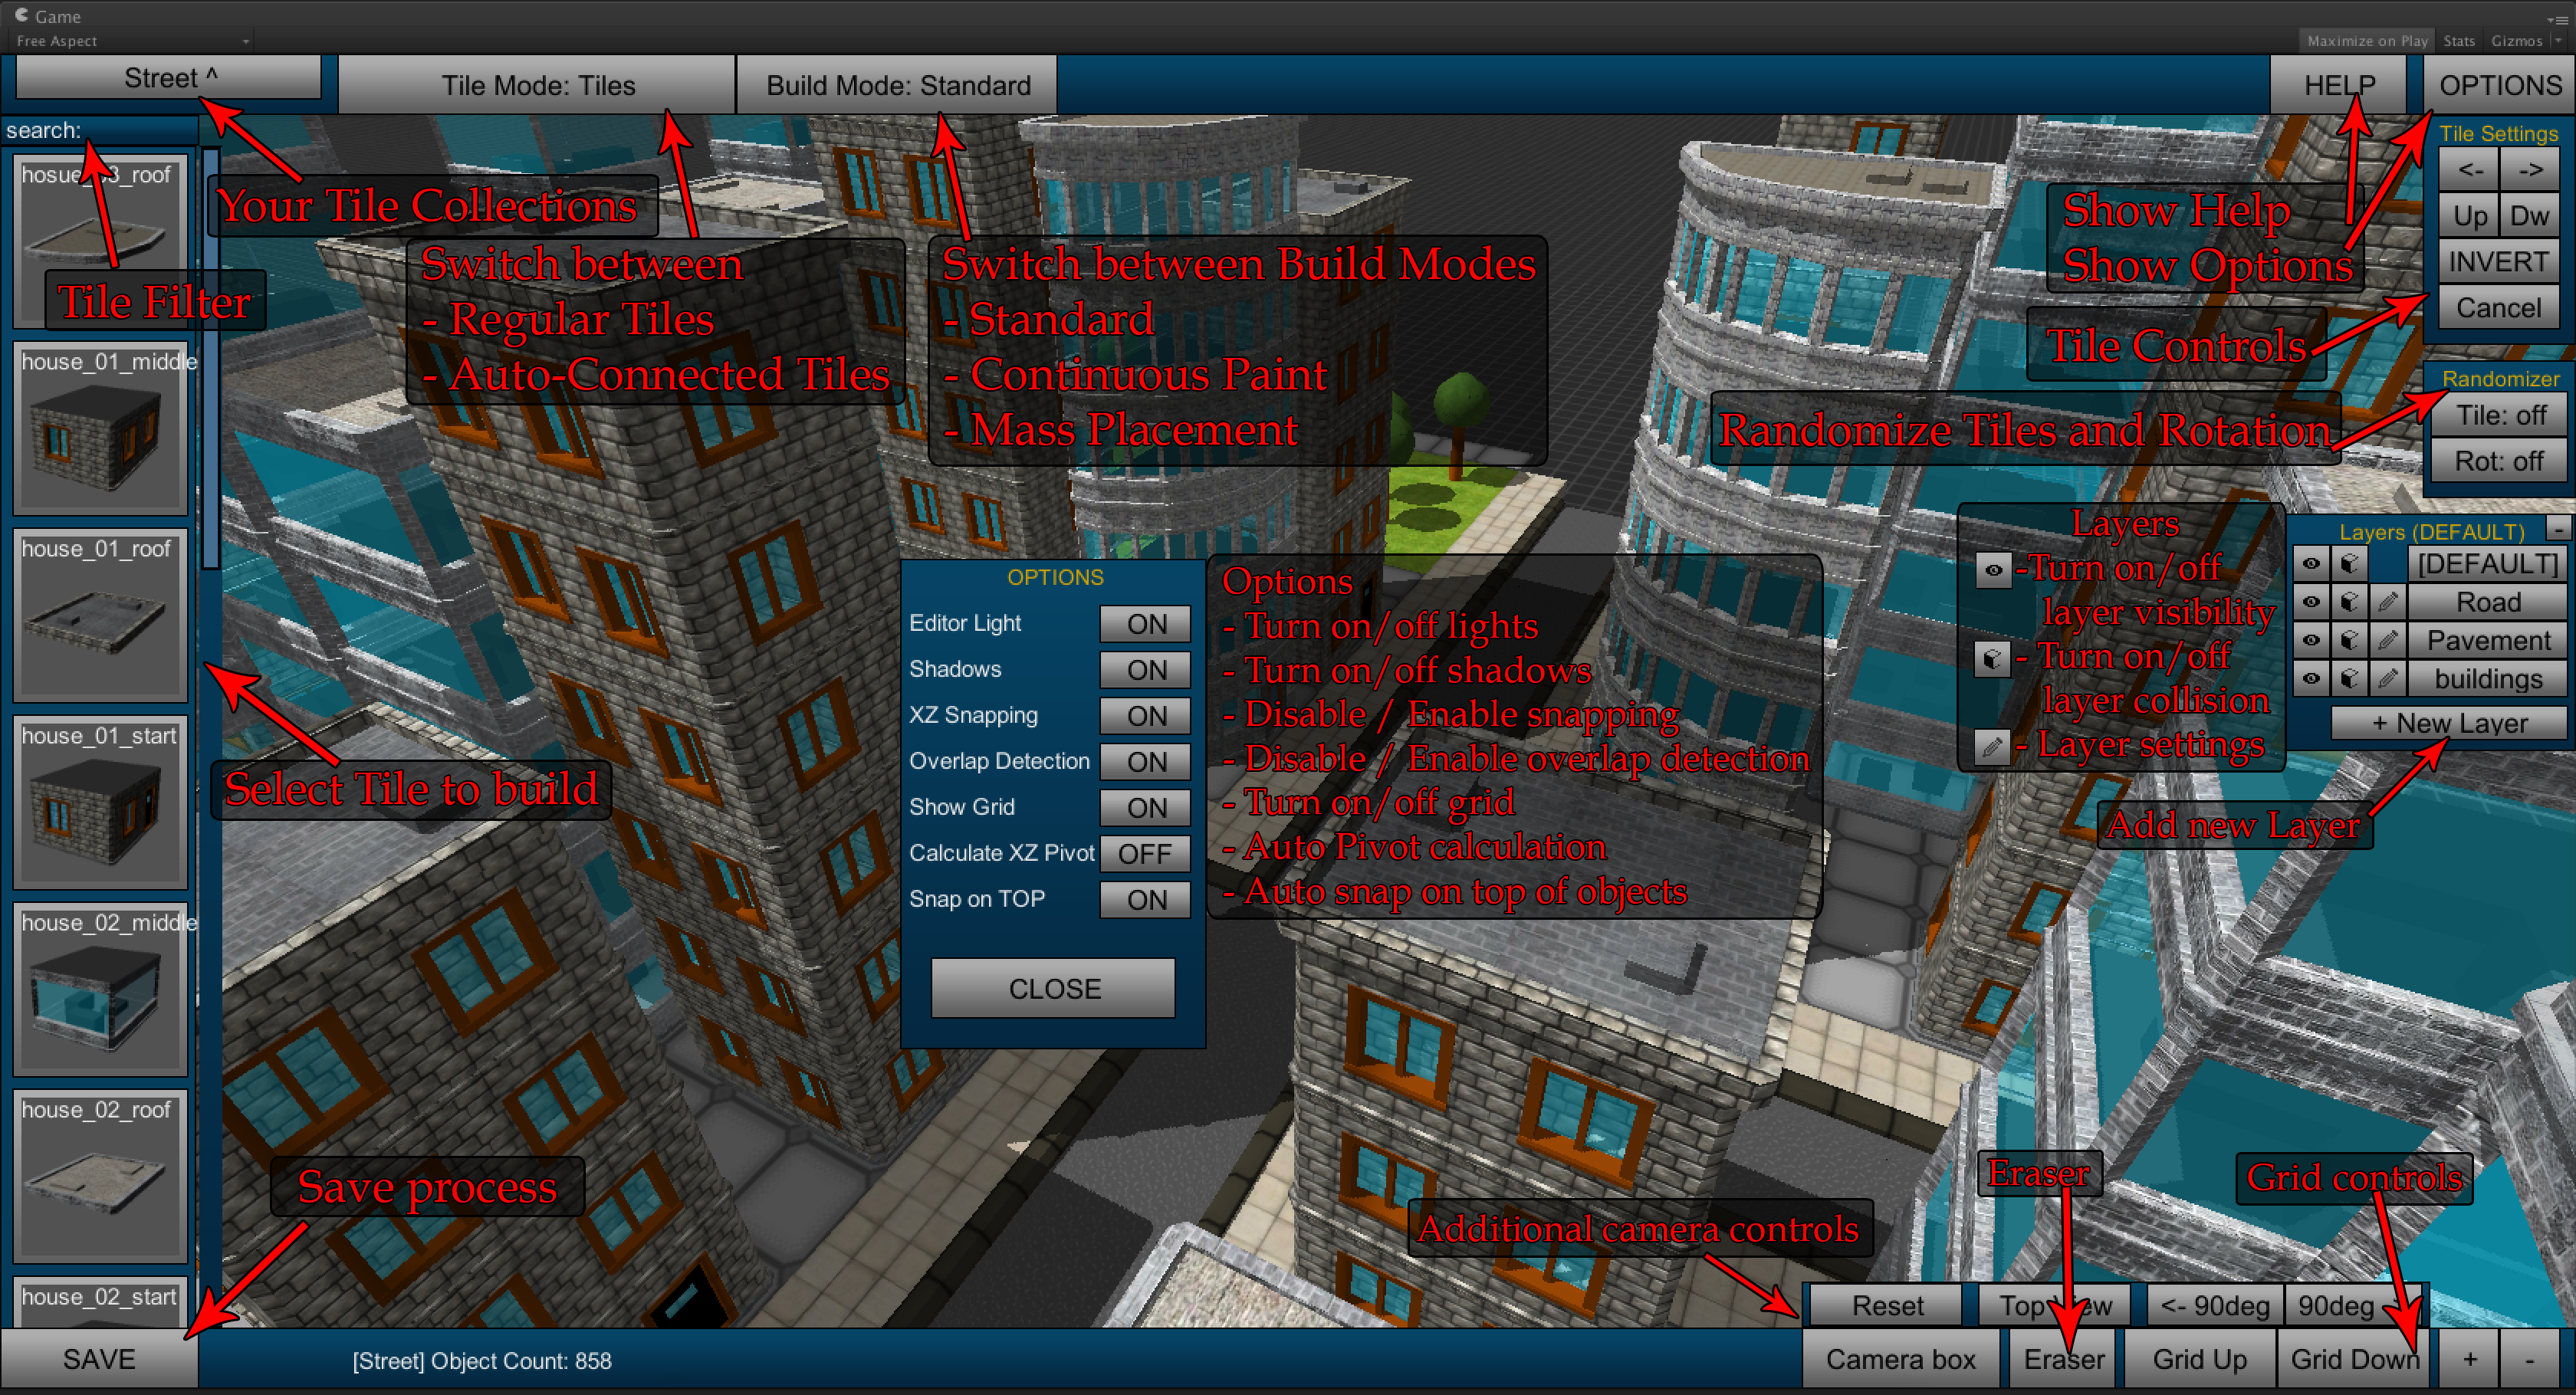
Editor functionality:
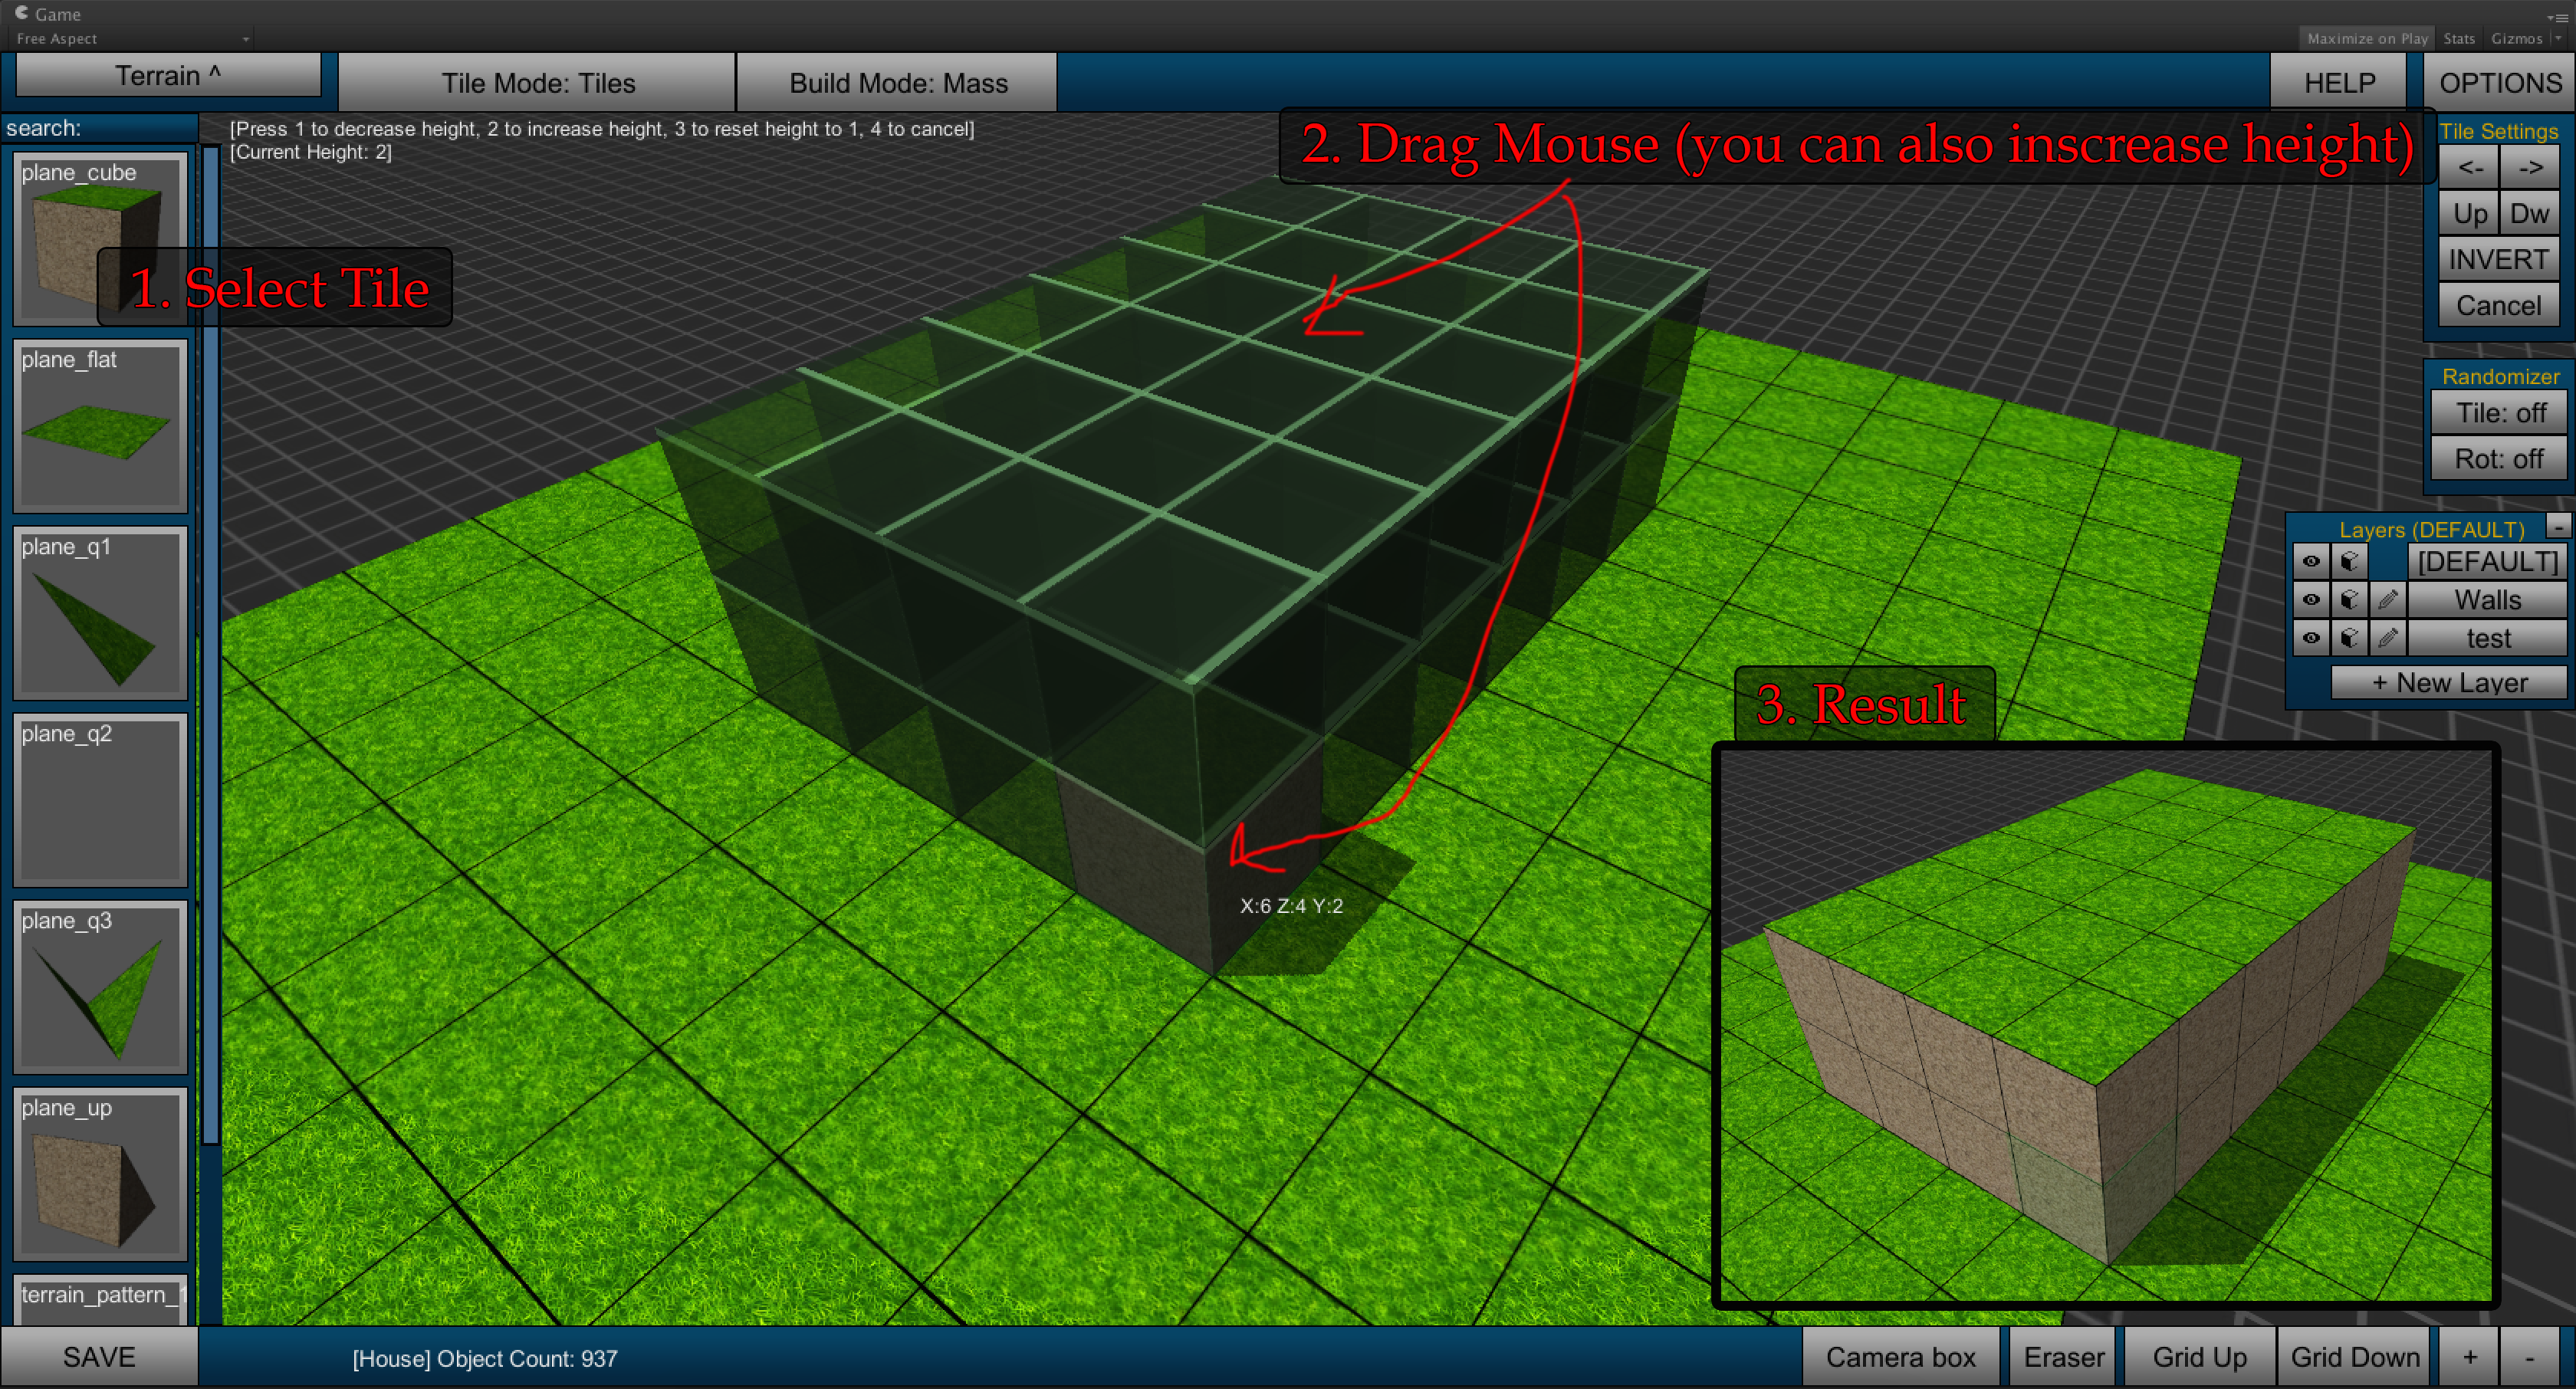
Using Mass Build Mode:
Move in scene using ASDW keys, rotate with QE and everything else should be intuitive to use. For other shortcuts check out Part [6].
Tile Connections are useful when you are making roads, walls, pipes and other similar tile collections. To use it in menu click Window->proTileMapEditor->Tile Connections and setup all the required tiles.

Here you will need to setup all the required tiles like: Turn, Forward, TForm, Cross and End.
You can also define Default Y Rotations if you did not setup initial rotations properly. So basically if you use Tile-Connections and you see that tiles are rotated wrong, you can change the default rotation to rotate them properly afterwards.
Using in the Editor:
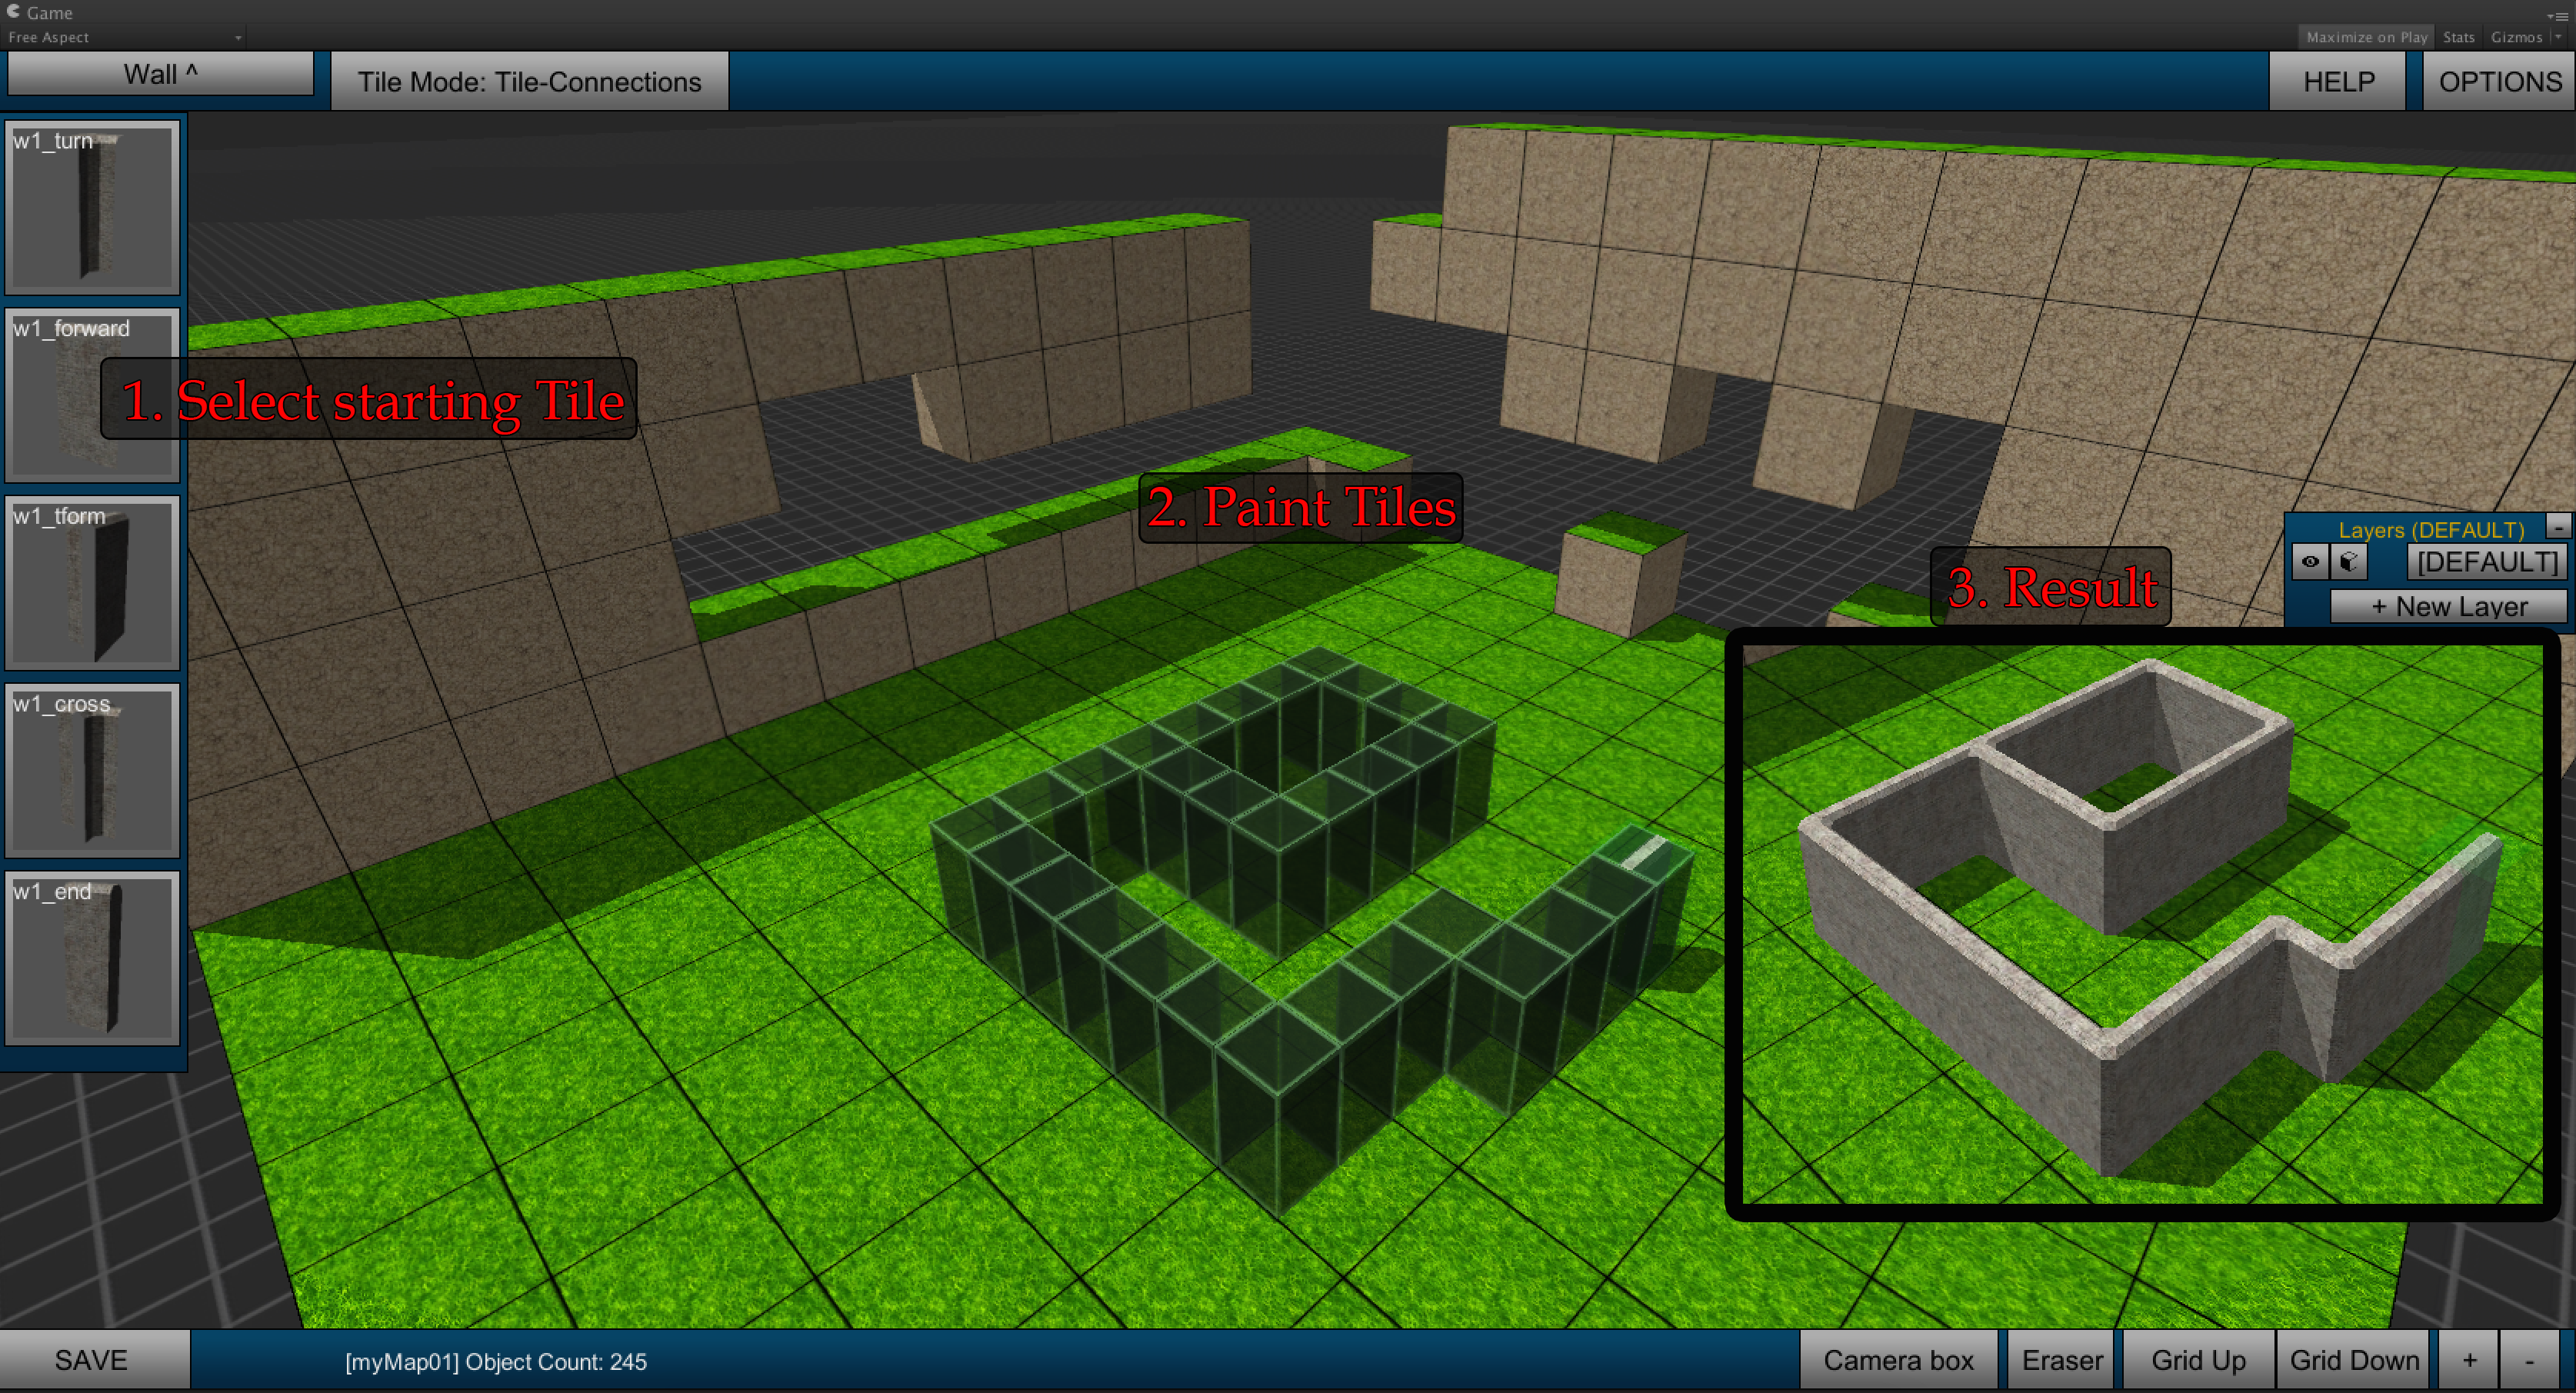
When you need to change Tile or Continue painting with connected Tiles, just click on existing Tile and it will replace it and you can continue.
Patterns are useful when you need to place same collection of tiles multiple times. For example if you have a base building or tree with bushes and rocks which are made using different tiles so you can place them as a collection multi times and you don’t need to remake same parts again. To create a Pattern, run proTile Map Editor scene and go to Patterns and create a new one.
1. Create a pattern, for example like this one:

2. Click on Export in the Editor and you will be asked to save it as a Prefab and give a name.

3. When you Export your Pattern at folder mentioned in the Message Box add Prefab to Tile Editor as usual Tile.

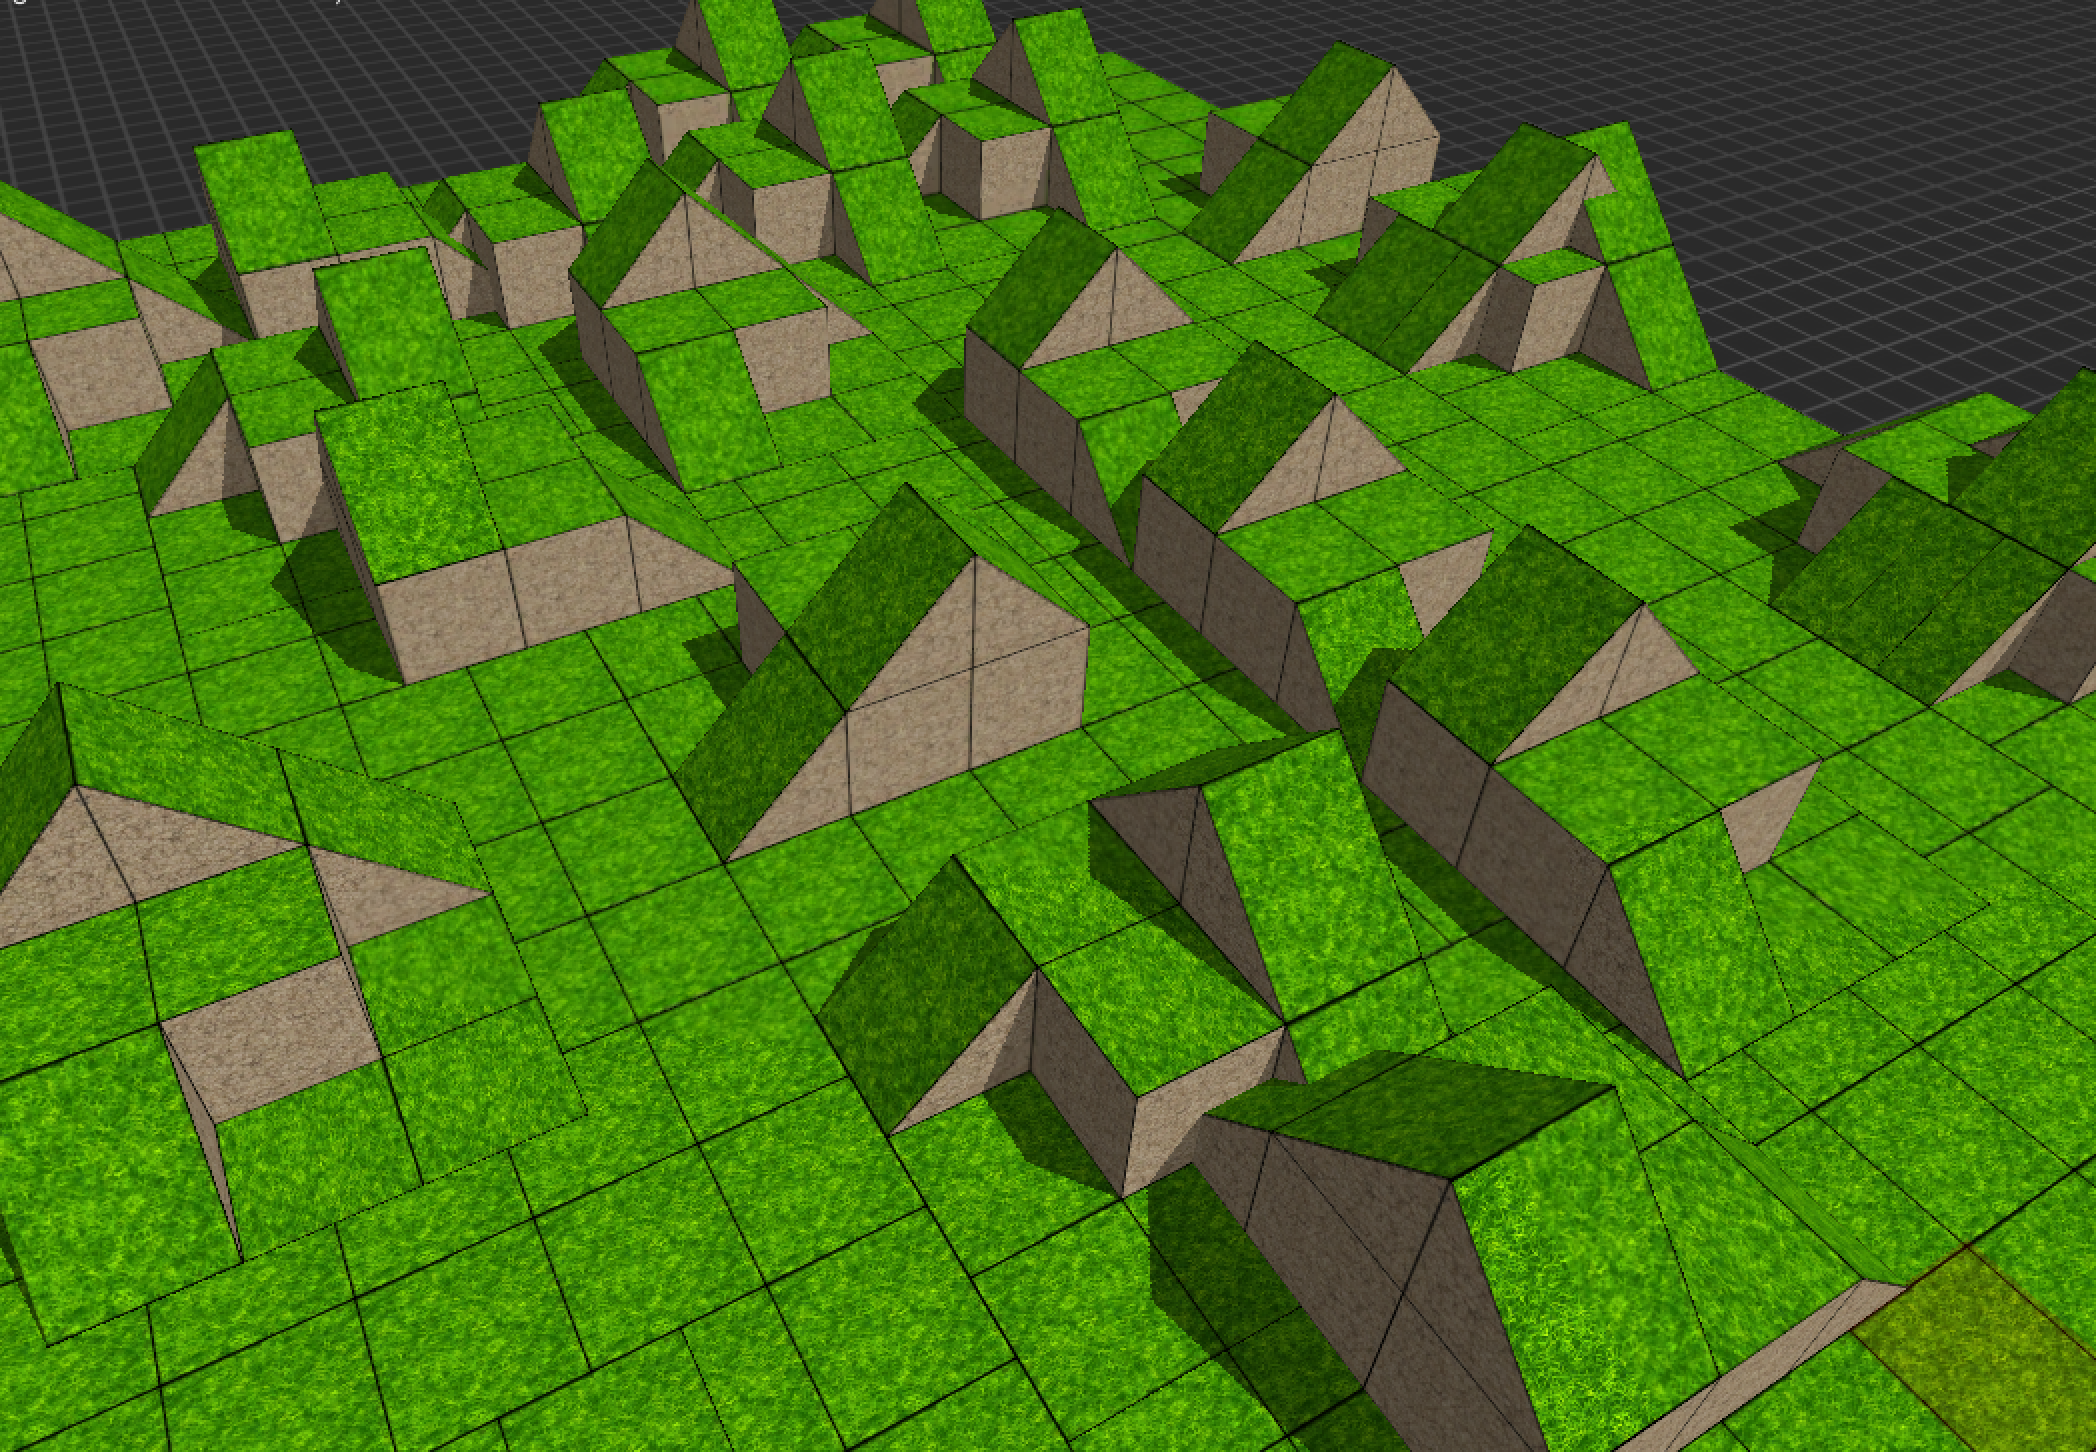
4. After that you will be able to use it as a usual Tile when building a map, and you can place lots of these collections as simple Tiles, like that:
As a suggestion, please try to avoid making really big patterns and weird combinations as well.
If you go to Menu and open Window->proTileMapEditor -> Settings-Controls, the window with multiple settings will appear.

- Grid Size X/Z: You can set up the default grid size in the map editor.
- Right Click Action: You can change your Right Click Action to: Rotate Object Left, Rotate Right, Rotate Up, Rotate Down, Rotate Invert or Erase.
- Y Snap Type: Here you can change the default object snap for Y axis. The main default is “Auto” which I made to always snap objects on top. When snapping on the object’s side, Y position will depend on various parameters that I’ve calculated to fit the best situation. There is also an option “Fixed Snap” which will snap objects every 1.0f on Y axis or you can Turn off Y snapping at all.
- Camera Type: Here you can setup your camera for your specific game type. The default is Isometric-Perspective, while there are other options like: Isometric-Orthographic, 2D Perspective, and 2D Orthographic.
- Grid Y Move Distance: Here you can define how much grid will move up or down.
Shortcuts:

There is a script called uteMapLoader. You attach it to the GameObject and there are several ways to use and load them for your game.
1. There is “Load Auto” checkbox in the component, so it will Load map as soon as GameObject is Instantiated in your scene. So either you leave your GameObject in the scene or you can make it as a prefab and Instantiate whenever you want at runtime and if “Auto Load” is checked, map will Load right away as well.
2. You can uncheck “Load Auto” in the component and you can call a public function “LoadMap()” from that component. It will look something like:
C#: GameObject.Find(“yourgameobjectname”).GetComponent<uteMapLoader>().LoadMap();
JS: GameObject.Find(“yourgameobjectname”).GetComponent(uteMapLoader).LoadMap();
If you don’t want to be frozen when loading maps dynamically you can use LoadMapAsync(); instead, it will load map slower but it will not freeze your game.
You can also define the speed of LoadMapAsync by writing parameter in LoadMapAsync(int). The default is 5, the higher the number the faster is load but of course less the performance.
3. You can also Load map in the Editor in offline mode by clicking “Load Map in Editor Scene Now” on the component. It will Load your map in the scene even if Editor is not in Play Mode. Afterwards you can uncheck “Auto Load” and just leave that map in the scene.
To optimise your Tile count in maps the best way to do is double object size and double its Tiling in Material, for example:
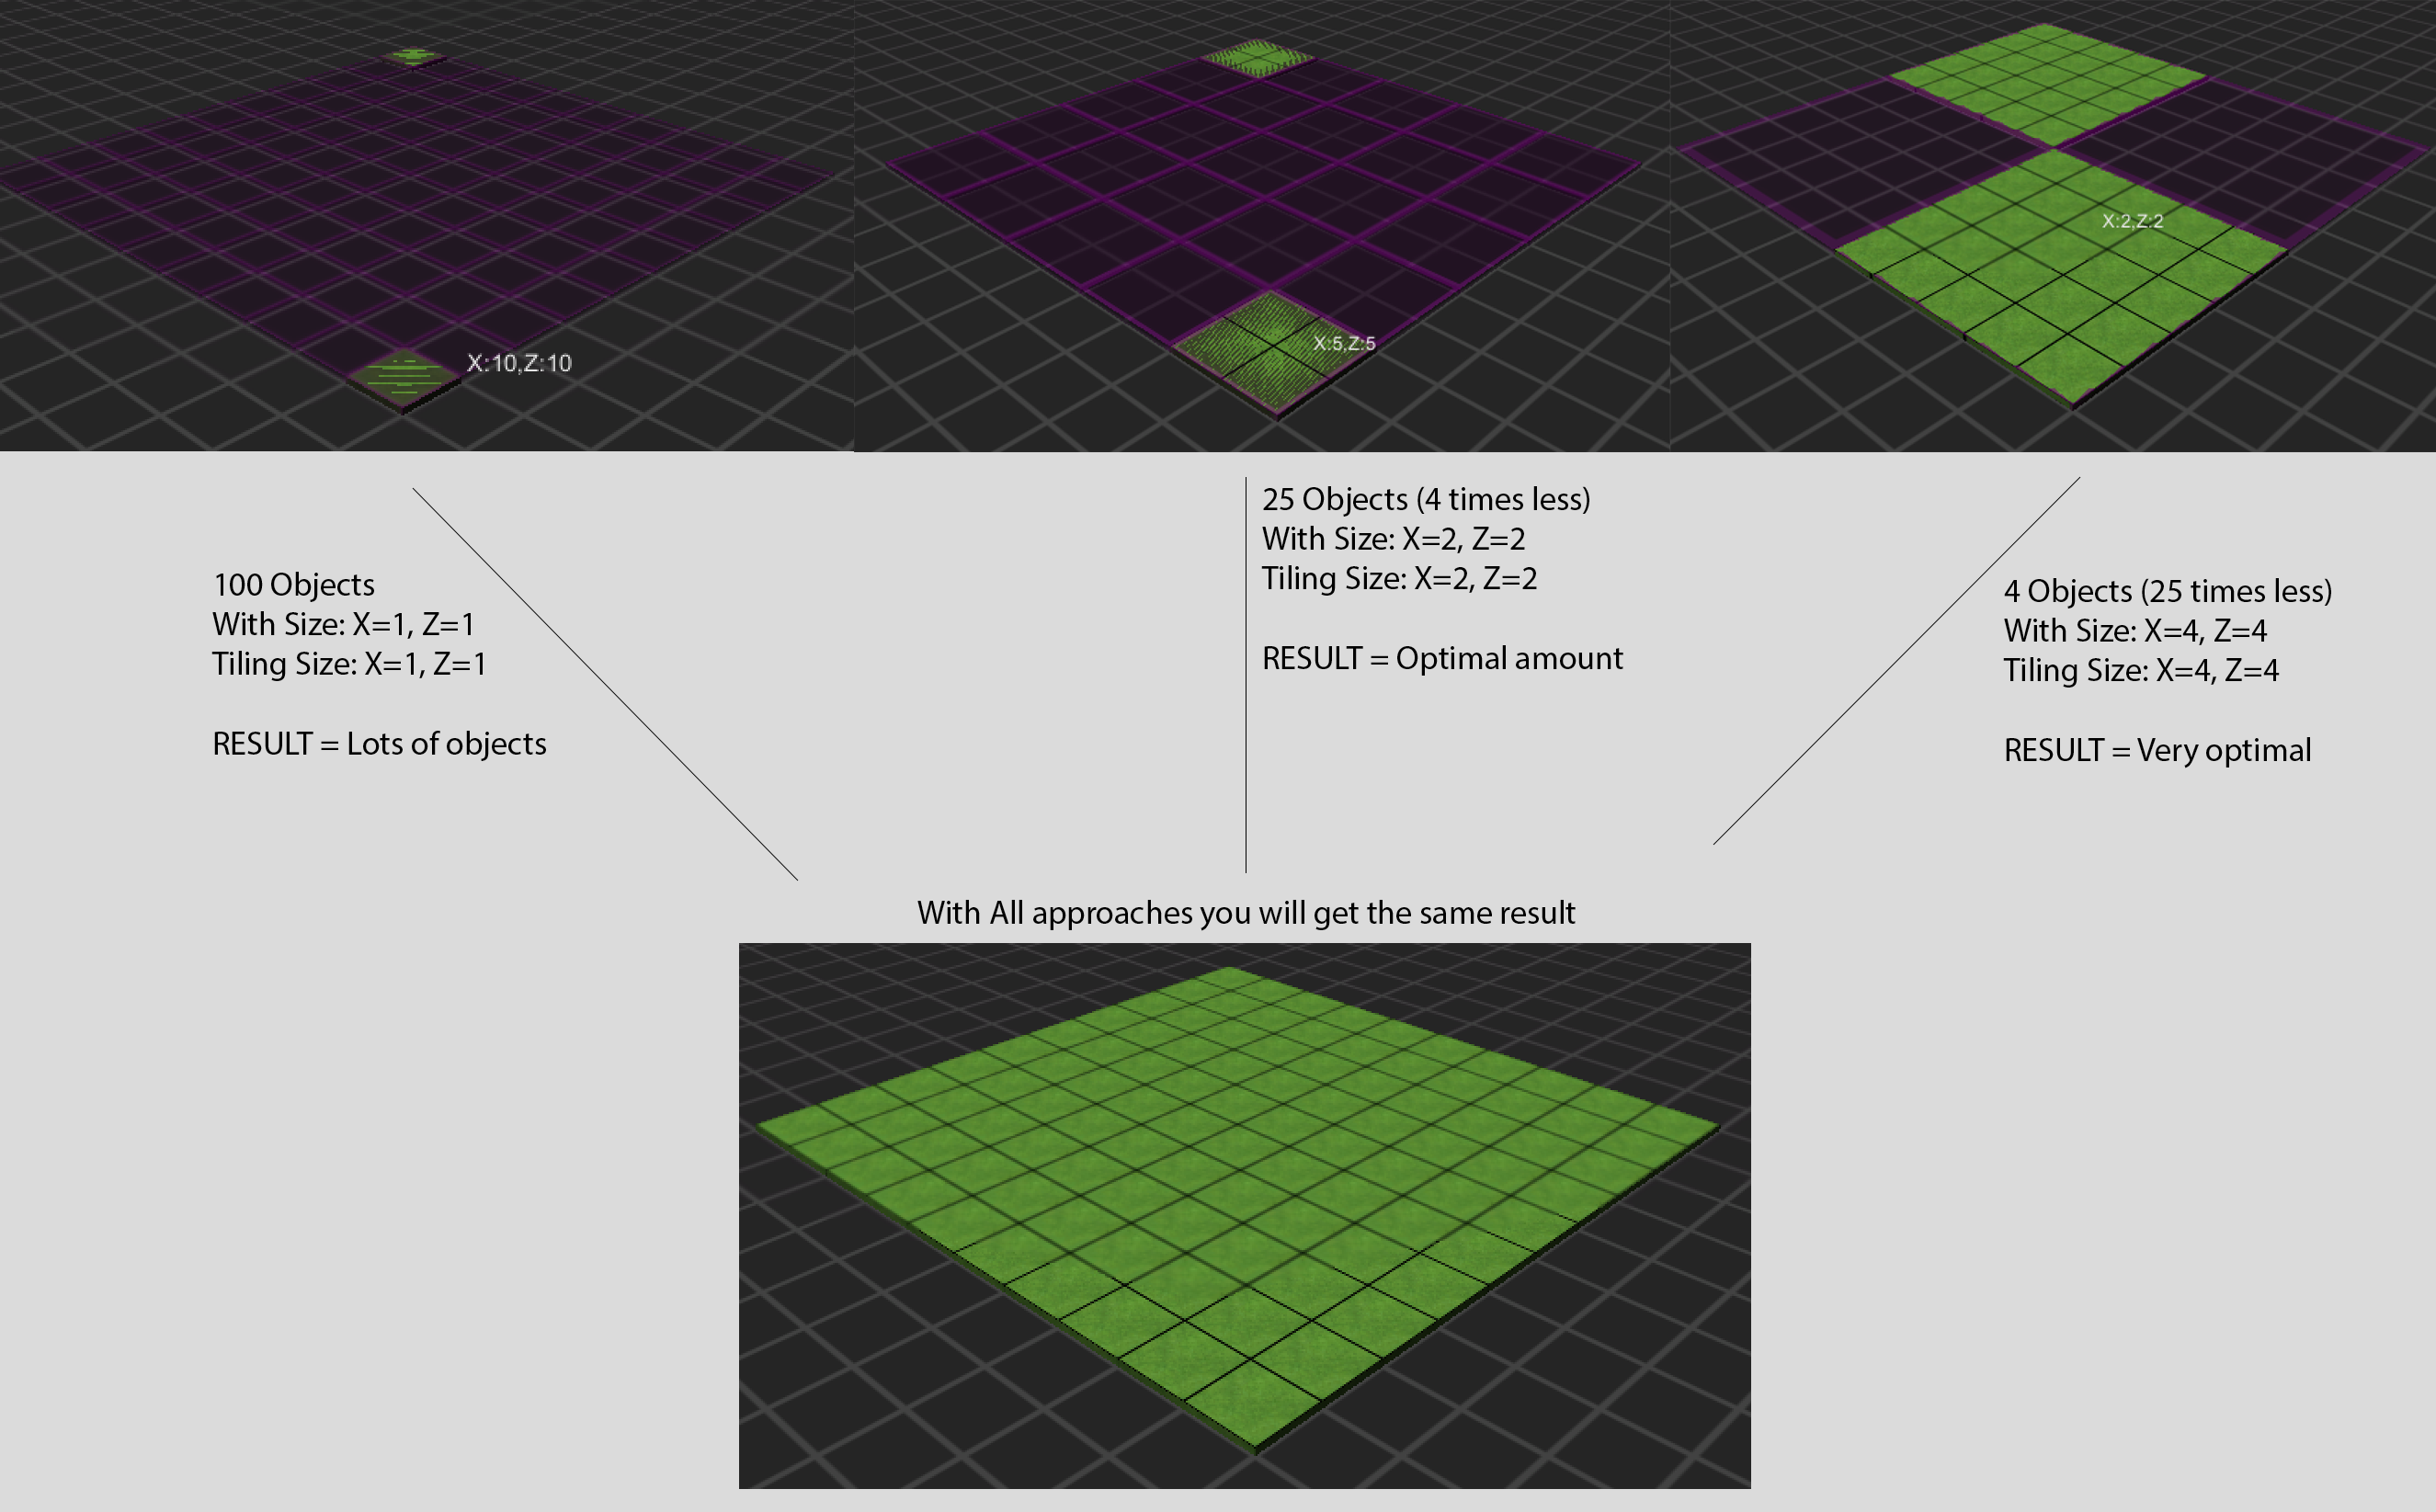
I also suggest making maps with 2-3k of Tiles, so it will work quite nice on mobile platforms as well.
In other cases, for example if you are building huge map (for like RPG game). Try making different map parts and use LoadMapAsync() when needed. So you will not need to load the whole thing right away.
There is also “Map offset” parameter in uteMapLoader Component. It will help you to load map parts only when needed at some specific point.
1. What is the optimal amount of objects suggested to have in map?
The optimal amount of objects in your map is about 5000. It also depends if you are using “Add Mesh Colliders” in uteMapLoader, since adding Mesh Colliders might take some time. Also combining meshes might take some time as well if you are loading map at runtime. The performance is not the main problem but it’s obvious that lots of objects take time to instantiate. For how to optimise and improve your loading time and performance you can find some tips in section [8] Optimisations and best practise. In general, even 2-3k is quite enough to make huge map if you are using tiles wisely.
2. How do I bake Lightmaps / Lightprobes / Navmesh in my map?
You will have to load it offline in the Editor by clicking on “Load Map in Editor Scene Now” button on the uteMapLoader component. Since in Tile Editor you can define a tile collection to be either static or dynamic you will find all your static objects in “YourGameObjectName->STATIC”. Sometimes it’s also good to uncheck “Add Mesh Colliders” and “Remove Leftovers” in the uteMapLoader Component, so it will leave all the original tiles and colliders. Then at runtime you can do the optimisation by adding uteCombineChildren Component and calling public method “public void Batch (bool AddMeshColliders=false, bool RemoveLeftovers=false, bool isItPatternExport=false)”.
3. How do I access specific objects in my map at runtime?
You have two basic options for that:
1. Mark these tiles as dynamic in Tile Editor, so they will not be batched and you will find them all in “YourGameObjectWith_uteMapLoaderComponent->DYNAMIC”.
2. Uncheck “Remove Leftovers” in uteMapLoader Component, so it will keep all the original objects after loading the map but they will be without MeshRenderer if “Static Batching” is on.
4. How do I block my objects (like units) from scripts when building in proTile Map Editor?
There is a public static bool which defines either you are running in the map editor or you are using your map in game. It’s called: uteGLOBAL3dMapEditor.isEditorRunning. So if you want to block scripts from running you can just check if(uteGLOBAL3dMapEditor.isEditorRunning==false) { // do stuff }.
5. Does this Editor work with Unity Free license?
Yes.
6. If I’m loading map somewhere at runtime and I want to check if it’s loaded, how can I check that?
There is a public bool called “isMapLoaded” in uteMapLoader Component. So when map is loaded it is set to true.
7. Is there a way to Load map without freezing my game at runtime? In other words to load it asynchronous.
Yes. You need to use LoadMapAsync(); or LoadMapAsyncFromPoint(Vector3 startPosition, int initialObjectCount, int loadObjectsPerFrame); instead of LoadMap();. It will Load slower but it will not freeze your game. Then you can check bool isMapLoaded in uteMapLoader Component to make sure that your map is ready to use.
You can also define the speed of LoadMapAsync by writing parameter in LoadMapAsync(int). The default is 5, the higher the number the faster is load but of course less the performance.
8. Can I use Assets as tiles which contain lots of objects inside (for example I have a Tile which has 5 mesh renderers on 5 different objects inside).
Yes.
9. Can I have scripts and other components on my tiles?
Yes.
10. On what platforms I can use my maps?
It works on all platforms.
10. Can I set Custom Pivot or Custom Snap Size?
Yes. There are 3 options available for you.
1. You can use uteCustomSnapSize Component on your Tile, where you can setup Collider Size & Collider Centre and Map Editor will use it as a Custom snap size for the Tile Object.
2. You can use uteTilePivotOffset Component on your Tile, where you can setup Tile Pivot Offset and Map Editor will use it as a Custom Offset for the Tile Object.
3. If your tiles are all the same size, you can set Fixed Tile Snap Size in Settings-Controls panel (window->proTileMapEditor->Settings-Controls.
11. Can I export my loaded map (or generated procedurally) to OBJ?
Yes. Add uteExportObject on the GameObject in the scene you want to export and click Export to OBJ (also see 9_ExportMapToOBJ example).
If you have any other questions, please leave a comment bellow.